After working with professional print manufacturers and having our own Epson Surecolor P8000 for professional prints, we found the best way to photograph artwork for prints. Many artists are intimidated to get professional photos of their art because they feel it is either too expensive or too confusing. We are here to tell you that anyone with a little know-how and determination can figure out how to photograph paintings professionally. As artists, learning about artwork photography will empower you to create prints of your artwork. This is a great way to get another stream of income while offering a product that has an attainable price point for a lot of people. We put together a couple of tips to help you take high-quality photos of your art, just like the professionals, without having an expensive photography studio.

Why taking photographs of your artwork is better than scanning it
The first problem with scanning your artwork is that some paintings are too large to scan. You can scan and stitch paintings digitally, but this can be quite a time-consuming process. Also, finding a scanner that is big enough to fit your large paintings can be very expensive and difficult.
Another problem you might run into when scanning your artwork is getting an accurate representation of the colors. If you don’t have access to high-quality scanners, photographs are a more accurate and cheaper solution.
Why natural light is better than artificial light
Colour is formed on a surface by specific wavelengths. Some wavelengths are absorbed, and others get reflected. If your light source does not contain all of the visible colors (also known as full-spectrum), you will not get an image that fully represents your painting. Daylight contains all color wavelengths, which is why it is the best for getting a high-quality photo of your artwork. Most artificial lights do not contain the full color spectrum or are missing important parts of the color spectrum that are necessary for taking high-quality photographs of your paintings. Taking your photographs indoors with normal household bulbs is even worse! Most of the time, the lights in your house will not properly expose your artwork. This will make your artwork look unprofessional. We have been taking photos of our art in direct sunlight for years, and there is no better way that we have found. In the next section, we will share our experience with various ways we tried to capture high-quality images of paintings.
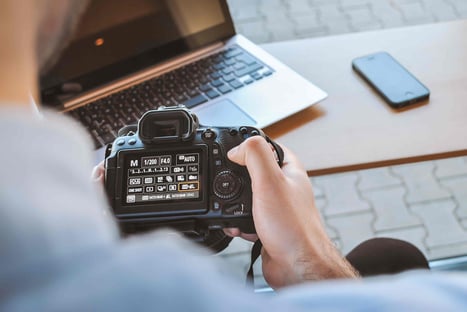
Camera Requirements & Settings
Taking photos of your artwork doesn't require the most expensive lights, all you need is to take your art out on a sunny day! We have tried scanning, renting studio equipment, & shooting in direct sunlight. Then we sent these photos to the print manufacturer to see which photo would be the best for making fine art prints. To our surprise, they told us the highest quality image was the photo taken in direct sunlight.
Using the right camera is important. Most newer smartphones have great cameras perfect for posting on social media, but not for prints. When you need to photograph your artwork for prints, you will need a higher-quality DSLR camera. The camera we use for prints is a Nikon D750. At the bare minimum, you will need a 12 megapixel camera for shooting your artwork. Without this, your prints will get distorted if you want to adjust the print size.
The ISO and aperture are two important settings that enable you to get a crisp, bright, and clear photograph of your artwork. ISO is the setting on your camera that controls how long the sensor is exposed to light. The longer the shutter is open to absorb light, the brighter your photo will turn out. Since we don't want to blow out the highlights, we recommend your camera to a low ISO setting. When you do this to your photo, it will be properly exposed and you will not have any glare.
Every lens lets in a specific amount of light. Less light passes through the lens with higher f-stop ranges. So for example, the lenses that work best for photographing artwork on a DSLR have an f-stop between f-8 and f-11.
Your camera should always be pointed parallel to your painting. If you do not make sure your camera is parallel to your photograph will turn out distorted. Use the same process to photograph drawings.
Using a grey card will help you find the right exposure. This tool is used by professional photographers to get the perfect white balance. Include this card in the frame when you take your photographs. Then, when you edit your photos after your photoshoot, you will have a reference point and eliminate any color cast present. Using the eyedropper tool will allow you to select a reference point from your grey card. When choosing your reference point click on the white square for an accurate white balance.
Things to keep in mind when photographing your artwork
- Capture an inch outside the canvas/painting. By doing this it gives you a little room to crop your image just in case there was an error.
- Photograph your artwork in batches! Since the sun moves fast or you might live in a rainy environment, plan ahead, and have lots of painting ready to go.
- Turn off in in-camera flash. When you do this, it will avoid any extra glare coming from your camera.
- Take lots of extra shots of each piece and remember to refocus the lens! This will ensure that you have backup pictures to use just in case your main shots don’t work out.
- You don't need the best lights for photographing your artwork. Sunlight is the best light source you can use since it contains the full color spectrum.
Editing Your Photos To Perfection

Now that you know how to photograph paintings, you can begin editing those photos to get the best representation of what the painting looks like in person. Adobe Photoshop and Lightroom are the digital tools you will need to edit your photographs. They do have a small learning curve, but adjusting color is super easy to learn with time. If you don't have Photoshop or Lightroom, there are free tools you can use that provide similar functionality. It's important to remember that you do not alter your artwork too much in editing. The goal is to get your artwork to look exactly how you saw the colors when it was painted.
When you export your photo, do not use small file formats. Your image should be around 20 megabytes. TIFF, PNG, & Large JPEG formats will work for printing your artwork. Do not export your photos in RAW format because the file is too big for most printers to handle. Here are some tips for editing your photos.
- Make sure your photo is cropped perfectly. Look for any unwanted dust, tape, paint boogers, or shadows.
- Compare your contrast, vibrancy, and brightness to accurately represent the original painting
- Shooting RAW format will give you much more flexibility when you edit your photos.
- Print a sample before you sell it to customers, that way you know that you’re providing high-quality work.
- Your computer monitor might not show an accurate representation of colors in your artwork. Doing a test print will show you the true colors and eliminate any guesswork.
Final Product
Now that you know how to photograph art with a digital camera, you're ready for prints, posting a beautiful photo on social media, or saving these photos for your personal archive. These are the steps we learned from trying multiple photography setups to find the best, most cost-effective, and easiest ways to get high-quality photos of your artwork. Say goodbye to hiring an expensive photographer to photograph paintings professionally. We hope this step-by-step guide helps you launch prints of your art and take this amazing step into becoming a professional artist! To learn more about how to turn your passion for art into your career, learn about our Mastery Program.